Demystifying Git: Mastering Version Control Systems (VCS) and Essential Commands for Beginners

Photo by Roman Synkevych on Unsplash
In the fast-paced world of software development, Git has emerged as one of the most influential tools in the last decade. With its ability to revolutionize version control, Git has become an indispensable asset for developers worldwide. However, for those unfamiliar with its power, Git can sometimes feel like a daunting burden.
Fear not! In this blog, we will unravel the mysteries of Git, exploring its myriad uses and equipping you with the necessary commands to navigate this powerful version control system with confidence. So, let's dive in and unlock the full potential of Git!
VCS and its History
Before delving into the specifics of Git, it's essential to understand the evolution of Version Control Systems (VCS) and how they have shaped the software development landscape. Let's explore the key milestones and significant developments in the history of VCS:
1. Local Version Control Systems: In the early days of software development, programmers relied on Local Version Control Systems. These systems stored different versions of files and directories on a local machine. One popular example was the usage of simple shell scripts or programs that copied and timestamped project directories. While they provided basic versioning capabilities, they lacked collaboration features and had limited scalability.
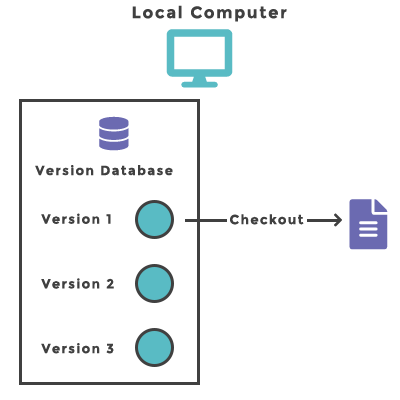
2. Centralized Version Control Systems (CVCS): As software projects grew more complex and distributed teams became commonplace, Centralized Version Control Systems (CVCS) emerged.

These systems utilized a central server to store the entire history of a project and allowed multiple developers to access and modify the codebase. Examples of CVCS include Concurrent Versions System (CVS) and Subversion (SVN). The reliance on a central server made them prone to single points of failure, and network issues could severely impact productivity.
3. Distributed Version Control Systems (DVCS): The limitations of CVCS paved the way for Distributed Version Control Systems (DVCS). In DVCS, each developer maintains a complete local copy of the repository, including the entire history. This decentralization not only eliminated the reliance on a central server but also brought significant performance improvements and enhanced collaboration capabilities.

One of the most influential DVCS to emerge was Git, created by Linus Torvalds in 2005. Git introduced a groundbreaking approach to version control, combining speed, scalability, and a robust set of features. Its design philosophy centered around the notion of distributed repositories and emphasized branching and merging, enabling developers to work independently on multiple features and seamlessly integrate their changes.
Git: The Game Changer
Git, as mentioned, is a Distributed Version Control System (DVSS) and has many more great features, etc, etc ... is a never-ending story 😁.
But it's time to enter this game and master it and this blog will definitely help you achieve it.
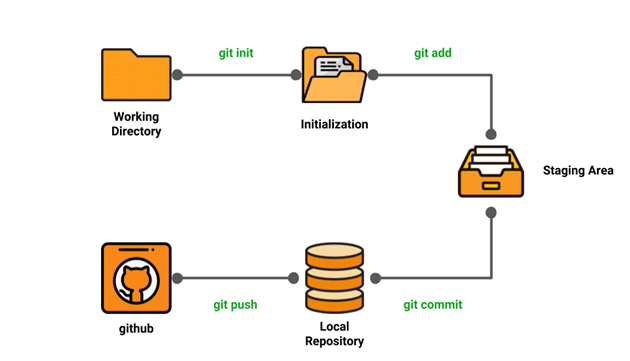
Configuring Git: Setting Up Your Identity
Before initializing a Git repository, it's essential to configure Git with your identity information. This ensures that your commits are attributed correctly and helps maintain a consistent record of your contributions. Let's explore how to configure Git with your name and email:
Setting Your Name and Email: Establishing Your Identity
To configure your name and email in Git, use the following commands:
$ git config --global user.name "Your Name"
$ git config --global user.email "yourname@example.com"
Replace "Your Name" with your actual name and "yourname@example.com" with your email address. The --global flag ensures that these configurations apply globally to all your Git repositories on your machine.
For example:
$ git config --global user.name "John Doe"
$ git config --global user.email "johndoe@example.com"
Checking Your Configuration: Verifying Your Settings
To verify your Git configuration, you can use the git config --list command. It will display the current configuration values, including your name and email.
$ git config --list
This command will show an output similar to the following:
user.name=John Doe
user.email=johndoe@example.com
...
Make sure your name and email are listed correctly, as they will be associated with your commits.
In addition to your name and email, Git provides various configurations to customize your experience which you can read at https://git-scm.com/book/en/v2/Customizing-Git-Git-Configuration.
How to get started?
To begin your journey with Git, the first step is to download and install Git on your system. You can easily download Git from the official website at git-scm.com.
Once Git is installed, follow the steps below to get started:
Create a folder on your system where you want to initialize Git. You can do this using a Graphical User Interface (GUI) or by using the Command Line.
For example, let's create a folder called "test":
  # Create a new folder using the Command Line
  mkdir test
Navigate into the newly created folder using the Command Line.
  # Go inside the folder
  cd test
Open the Command Line (Terminal for macOS or Git Bash for Windows) and initialize Git in the folder using the following command:
  # Initialize Git in the folder
  git init
After running this command, you will notice the creation of a hidden file named .git in the folder. This file serves as the repository's backbone, storing all the essential tracking information, commit histories, and other repository-related data.
It's important to note that in the developer's language, this folder is referred to as a repository or repo for short. However, since it is stored on your local computer, it is commonly known as a local repository.
Introducing Git Add and Git Commit
Once you have initialized Git in your local repository, it's time to start tracking changes to your project and creating meaningful commits. Git provides two essential commands for this purpose: git add and git commit.
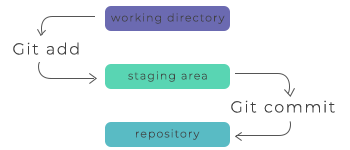
Before we dive into these specific commands, let's understand some key concepts in simpler terms:
When you're working on a project, Git helps you keep track of your changes and progress. Imagine you're working on a document, and you want to save different versions as you make edits. Git allows you to do just that but with a lot more power and control.
Making Changes and Staging:
When you modify/create/delete files in your project, Git wants you to be intentional about which changes should be saved. It's like being a director of a play. Before the actors perform on stage, you decide which scenes are ready for the audience to see.
In Git, the first step is to tell Git which changes you want to include in the next "scene" or "commit." This process is called staging. It's like assembling the actors and props on the stage, getting everything ready for the performance.
Git Add: Preparing for the Show / Tracking Changes
To stage changes in Git, you use the git add command. It's like selecting the specific scenes you want to include in the play. You can choose to add just one scene (file) at a time or even the whole act (all modified files). Git will remember which changes are ready for the next commit.
For example, let's say you're working on a website and you have made changes to multiple files, such as updating the homepage, modifying a CSS file, and adding some new images. You can selectively stage these changes using git add:
# Stage the changes for the homepage file
git add index.html

# Stage the changes for the CSS file
git add styles.css

# Stage all the changes in the current directory and its subdirectories
git add .
Git Commit: Saving the Act / Saving Changes
Once you've staged your changes, it's time to save them permanently in Git's history. This is where the git commit command comes in. Think of it as taking a snapshot of the entire stage with all the actors and props in place. You give this snapshot a meaningful name or description, called a commit message, so that you can easily understand what the changes are about later on.
For instance, after staging the changes, you can create a commit using git commit:
# Create a commit with a descriptive message
git commit -m "Updated homepage, modified CSS, and added new images"
The -m flag is used to specify a commit message within quotes. It's important to write descriptive commit messages that succinctly summarize the changes you made. A good commit message helps you and others understand the purpose and context of the commit in the future.
Once you commit your changes, Git stores them permanently in the repository's history.
Git History: Rewinding and Playback:
Now, imagine you want to rewind the play and go back to a specific scene or version. Git allows you to do that effortlessly. You can revisit any commit in history, replaying the changes and observing how your project evolved over time. It's like having a time machine for your code!
Understanding Git Status, Git Logs, and More
In this section, we will explore some additional Git commands that will enhance your understanding of the repository's status, commit history, and advanced log filtering options. Let's dive in with some practical examples:
Git Status: Checking Repository Status
The git status the command allows you to see the current status of your repository. It shows which files have been modified, which changes are staged for the next commit, and which files are untracked.
Example:
$ git status
Output:
On branch main
Changes to be committed:
  (use "git restore --staged <file>..." to unstage)
        modified:   index.html

Untracked files:
  (use "git add <file>..." to include in what will be committed)
        styles.css
The output provides a clear overview of the modified and untracked files, helping you understand the current state of your repository.
Git Logs: Exploring Commit History
The git log command displays the commit history of your repository, showing the most recent commits first. It includes information such as the commit hash, author, date, and commit message.
Example:
$ git log
Output:
commit d2e4657c5f60ef5d4e24c555567cffb1c1a0c7e4
Author: John Doe <johndoe@example.com>
Date:   Tue Jun 1 15:26:49 2023 +0300

    Added new feature: user authentication

commit 76a9fd5b1c6ca9e4a9e712b35088214826b869b9
Author: Jane Smith <janesmith@example.com>
Date:   Mon May 31 10:15:27 2023 +0300

    Updated homepage content and styles
The output displays each commit's hash, author, date, and commit message, allowing you to track the history of changes in your repository.
Git Log Filtering: Fine-tuning the Output
You can refine the git log output by using various filtering options. Here are a few examples:
To see the actual content changes made in each commit, you can use the
-pflag:$ git log -pThis displays the commit history along with the differences introduced in each commit.
To limit the number of commits shown, you can use the
-nflag followed by the desired number of commits:$ git log -n 3This displays only the three most recent commits.
To format the log output in a specific way, you can use the
--prettyflag with different options. For example, using--pretty=onelineprovides a concise one-line summary of each commit:$ git log --pretty=onelineThis shows the commit history with each commit represented on a single line.
These are just a few examples of how you can filter and format the git log output to suit your needs. More to explore at https://git-scm.com/docs/git-log.
Branching and Merging: Parallel Storylines in Git
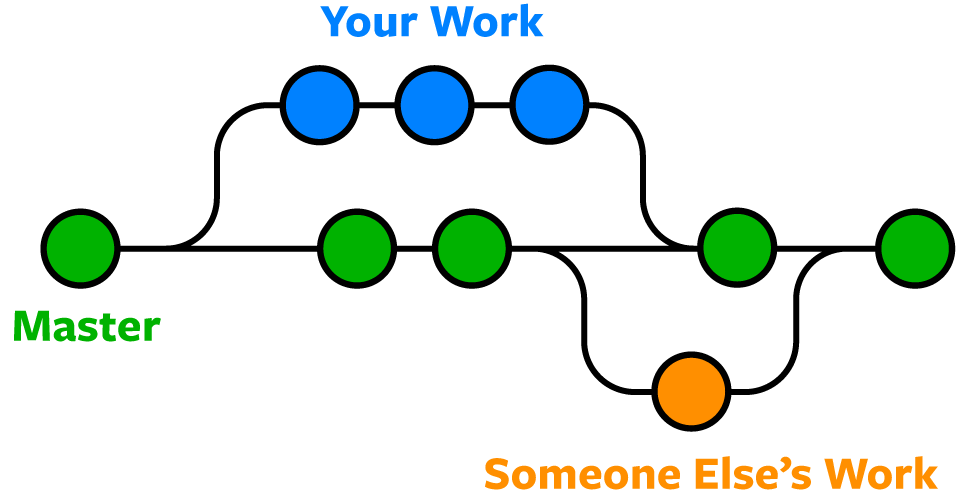
In this section, we'll explore the powerful concepts of branching and merging in Git. Imagine you're working on a project with your team, and you need to add a new feature while ensuring the stability of the existing codebase. Git's branching and merging capabilities come to the rescue by allowing you to create parallel storylines and seamlessly merge them when ready. Let's dive into this fascinating world:
Creating a Branch: Parallel Storylines
Think of a branch in Git as a separate storyline or an alternate reality where you can make changes to your project without affecting the main storyline. Let's say you want to work on a new feature called "User Authentication." You create a new branch named "user-auth" using the following command:
$ git branch user-auth
This creates a new branch called "user-auth" that starts from the current commit. You can now work on this branch independently, without disturbing the main branch.
Switching to a Branch: Changing the Storyline
Once you've created the "user-auth" branch, you can switch to it using the git checkout command. It's like entering a parallel universe where you can shape the feature's storyline without affecting the main branch.
$ git checkout user-auth
Now you're on the "user-auth" branch, and any changes you make will only be reflected in this storyline. You can confidently work on implementing user authentication features, making modifications, and adding new files.
Making Changes and Committing: Shaping the Story
On the "user-auth" branch, you can start making changes to your project. For instance, you might add new files for user registration and login, modify existing code to handle authentication, and update relevant documentation. As always, remember to use git add and git commit to save your changes along the way.
$ git add .
$ git commit -m "Implemented user registration functionality"
These commits on the "user-auth" branch represent the progress made specifically for the user authentication feature. It's like writing the story for that particular feature within its dedicated branch.
Merging Branches: Bringing the Storylines Together
Once you've completed work on the "user-auth" branch and tested the feature thoroughly, it's time to merge it back into the main branch. Merging combines the changes from one branch into another, bringing the storylines together.
To merge the "user-auth" branch into the main branch, switch back to the main branch using git checkout and then execute the merge command:
$ git checkout main
$ git merge user-auth
Git will automatically integrate the changes from the "user-auth" branch into the main branch, creating a unified storyline where the user authentication feature is now part of the main project.
Handling Merge Conflicts: Resolving Conflicting Storylines
Sometimes, Git encounters conflicting changes during the merge process. This happens when the same lines of code are modified differently in the merging branches. Let's say two developers made conflicting changes to the same file on different branches.
<<<<<<< HEAD
function authenticateUser(username, password) {
    // Improved efficiency code by Developer B
=======
function authenticateUser(username, password, rememberMe) {
    // Additional parameters added by Developer A
>>>>>>> user-auth
    // Rest of the function
}
Git indicates the conflicting sections using special markers (<<<<<<<, =======, >>>>>>>). To resolve the conflict, you'll manually edit the file, choosing which changes to keep or combining them appropriately.
In this case, you might decide to retain both the additional parameters and the improved efficiency, resulting in the following resolved conflict:
function authenticateUser(username, password, rememberMe) {
    // Improved efficiency code by Developer B
    // Additional parameters added by Developer A
    // Rest of the function
}
After resolving the conflict, save the file, and add it using git add, and continue the merge process by executing git commit.
Remotely Accessing Repositories: Push, Pull, and More
In this section, we'll explore the essential Git commands for remote repository access. Git allows you to collaborate with others by sharing your code on remote repositories like GitHub. Let's start by understanding the concept of remote repositories and then dive into the commands for pushing, pulling, and adding remote repositories to your Git configuration.
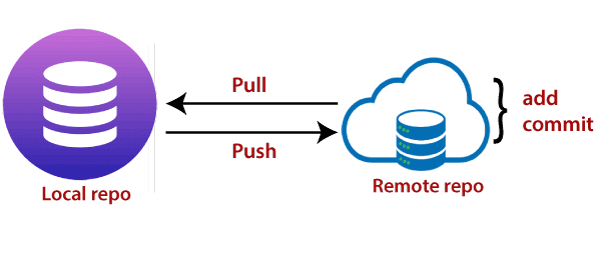
Understanding Remote Repositories: Collaborating Beyond Your Local Machine
In Git, a remote repository refers to a copy of your project hosted on a remote server, typically on platforms like GitHub, GitLab, or Bitbucket. Remote repositories enable you to collaborate with other developers, share your code, and synchronize your work across multiple machines.
When working with remote repositories, it's important to keep a few cautions in mind:
Network Connectivity: Remote repository access requires a stable internet connection. Ensure you have an active and reliable internet connection to interact with remote repositories.
Access Permissions: Depending on the hosting platform and repository settings, you may need appropriate access permissions to push your changes to a remote repository. Make sure you have the necessary privileges to avoid any restrictions.
Code Sharing: Remote repositories are meant to share your code with others. Be mindful of sharing sensitive information or confidential data unintentionally. Review your code before pushing it to a remote repository to ensure you're not exposing any sensitive information.
Now that we understand the concept of remote repositories and the cautions involved, let's explore the Git commands for remote repository access.
Adding a Remote Repository: Connecting to GitHub
To connect your local Git repository to a remote repository, you need to add the remote repository's URL to your Git configuration. Let's assume you have a repository on GitHub that you want to connect to.
First, obtain the repository's URL from GitHub. It typically looks like this:
https://github.com/your-username/my-project.git
In your local Git repository's directory, run the following command to add the remote repository:
$ git remote add origin https://github.com/your-username/my-project.git
This command adds a remote repository named "origin" and associates it with the provided GitHub URL. You can choose any name for the remote repository, but "origin" is commonly used as the default name.
Pushing Changes: Sharing Your Commits
Once you have made local commits and want to share them with the remote repository, you use the git push command. This command transfers your local commits to the remote repository, making them accessible to others.
To push your changes to the remote repository, use the following command:
$ git push origin main
This command pushes the commits from your local "main" branch to the remote repository associated with the "origin" remote. The changes will be reflected in the remote repository, allowing others to see and access your work.
Pulling Changes: Updating Your Local Repository
To incorporate changes made by others in the remote repository into your local repository, you use the git pull command. This command fetches the latest commits from the remote repository and merges them into your current branch.
To pull changes from the remote repository, execute the following command:
$ git pull origin main
This command fetches the latest commits from the "origin" remote's "main" branch and merges them into your local branch. It ensures your local repository stays up to date with the changes made by your collaborators.
In the upcoming blogs, we'll explore more advanced Git techniques, including branching and merging strategies, resolving conflicts in collaborative scenarios, and utilizing pull requests for code review. Stay tuned as we unravel the full potential of Git's version control capabilities!
Also, comment down for any topic to be blogged.