
Easy Video Calling: Build Your App with WebRTC and WebSockets
Experience Instant Communication Made Simple!


Welcome, absolute beginners! Today, we're diving into the exciting world of video-calling apps. Have you ever dreamt of crafting your own Zoom, Skype, or Omegle? Well, today's your lucky day because we're harnessing the power of two robust technologies – WebRTC and WebSockets – to bring your vision to life.
What is WebRTC?
WebRTC, short for Web Real-Time Communication, is a free, open-source project enabling real-time communication between web browsers and mobile applications. With WebRTC, you can integrate features like video calling, voice calling, and peer-to-peer file sharing into your web applications without relying on plugins or native apps. Essentially, it's an API native to your browser, allowing direct connections even if the backend server disconnects, ensuring seamless video calls.
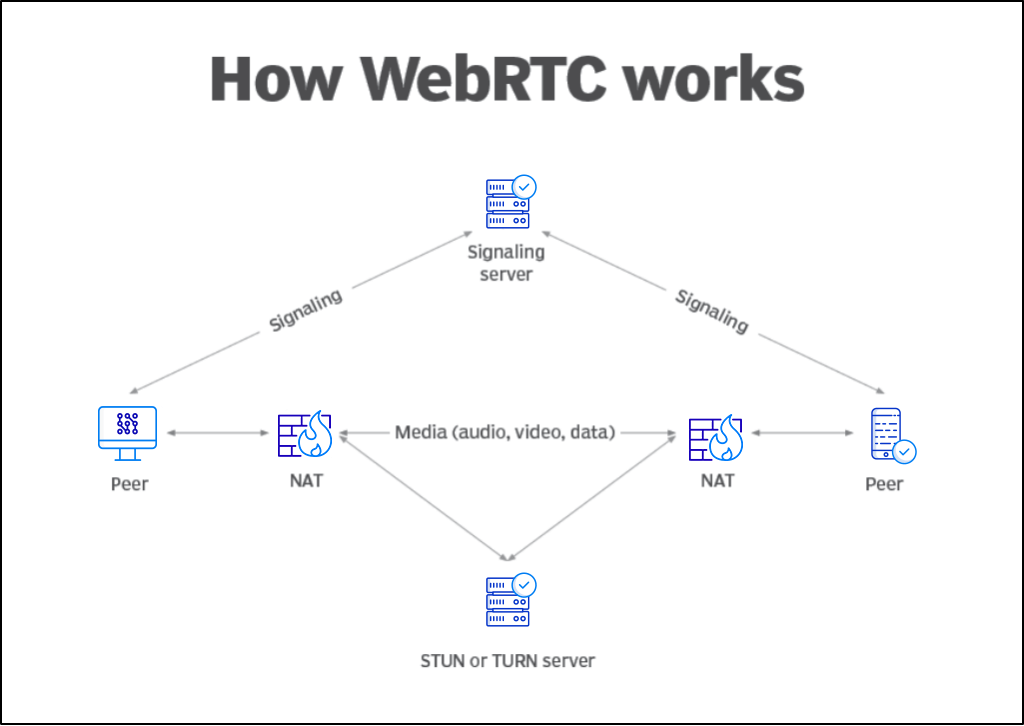
Let's start with the basics. Imagine your PC or mobile device has a browser, which inherently supports the WebRTC API. Suppose your PC offers an address to share with your intended connection. For this purpose, we employ a signaling server, typically utilizing WebSockets.
What are WebSockets?
WebSockets establish a full-duplex communication channel over a single, persistent connection between the client and server. Unlike HTTP, which follows a request-response model, WebSockets enable real-time, bidirectional communication, making them ideal for applications like chat apps, online gaming, and, of course, video calling.
Setting up the signaling server is another crucial step in creating a simple video-calling app.
Important Terms in Using WebRTC API:
1. RTCPeerConnection: This is the core of WebRTC and represents a connection between two peers. It allows audio and video communication as well as data exchange between browsers. Here's a code snippet for creating an instance:
// Sample code snippet for creating a new RTCPeerConnection
const peerConnection = new RTCPeerConnection();
2. Your Public IP Address: It is required so that the peer browser knows whom to connect to. Still, the issue is that you are connected to some network provider and hence the PC doesn't know its public IP address there are many more issues your browser needs to request some STUN/TURN servers so that they may send you your device data which you can send to other peer and vice versa.
3. STUN/TURN Servers: These servers assist in establishing connections between peers by helping them discover their public IP addresses and enabling communication through firewalls and NAT devices. STUN servers are used to find your public IP, while TURN servers relay data if direct peer-to-peer communication fails.
4. Creating offers / creating answers: Creating offers and creating answers are technical terms used to describe the process of initiating and responding to calls in simpler terms. When a browser wants to start a call, it initiates the process by creating an offer. This involves generating an object that includes essential information like the type of call (offer) and a Session Description Protocol (SDP). During this process, the browser automatically communicates with STUN/TURN servers to gather network information. The offer object contains details about the media streams it intends to share and its network setup.
Similarly, when a browser receives a call, it generates a response known as an answer. This answer object includes the type of response (answer) and an SDP for the other peer, detailing its own media streams and network configuration
5. Local and remote streams: Local streams represent the audio and video tracks captured by your browser's media devices, such as a webcam or microphone. Remote streams are streams received from the peer.
6. Local and remote description: Now the offer created and the answer created after being sent to both the peer contains SDP, which is then set as remote and local description according to the scenario. For ex., if your browser created the offer i.e started the video call then your SDP after creation would be set as local description, and the answer object that you get as a response from the other server contains an SDP that you set as remote description and vice versa for another case.
// Sample code snippet for creating an offer
const offer = await peerConnection.createOffer();
await peerConnection.setLocalDescription(offer);

// Sample code snippet for creating an answer
const answer = await peerConnection.createAnswer();
await peerConnection.setLocalDescription(answer);
7. Ice Candidates: ICE (Interactive Connectivity Establishment) candidates serve as network interfaces utilized by WebRTC for establishing peer-to-peer connections. These candidates play a crucial role in traversing NAT (Network Address Translation) and firewalls by exploring various network paths until a connection is successfully established. Put simply, both peers generate ICE candidates, which are then exchanged between them to facilitate connection establishment.
Note:- From the above points, you have an idea that this transfer of offers and answers between two peers is the need of the signaling server.
Lets Code:
- Frontend: Create a client that establishes an RTCPeerConnection and connects to the WebSocket server.
import React, { useEffect, useRef } from 'react';
import io from 'socket.io-client';

const socket = io('http://localhost:3001'); // Change the URL based on your server address

const App = () => {
  const localVideoRef = useRef(null);
  const remoteVideoRef = useRef(null);
  let peerConnection;

  useEffect(() => {
    const startWebRTC = async () => {
      try {

        // fetching the local stream from browser
        const stream = await navigator.mediaDevices.getUserMedia({ video: true, audio: true });
        localVideoRef.current.srcObject = stream;

        // Create RTCPeerConnection with STUN server configuration
        peerConnection = new RTCPeerConnection({
          iceServers: [
            {
              urls: 'stun:stun.l.google.com:19302' // Google's public STUN server
            }
            // Add more STUN/TURN servers if needed
          ]
        });

        // Add local stream to peer connection
        stream.getTracks().forEach(track => peerConnection.addTrack(track, stream));

        // Event listener for receiving remote tracks
        peerConnection.ontrack = (event) => {
          if (!remoteVideoRef.current.srcObject) {
            remoteVideoRef.current.srcObject = new MediaStream();
          }

            // swetting the remote stream in remotevideoref
          remoteVideoRef.current.srcObject.addTrack(event.track);
        };

        // Event listener for ICE candidates
        peerConnection.onicecandidate = (event) => {
            // this are our ice candidates which we need to share with other peer
          if (event.candidate) {
            sendIceCandidate(event.candidate);
          }
        };

        // Event listener for ICE connection state change
        peerConnection.oniceconnectionstatechange = (event) => {
          console.log('ICE connection state change:', peerConnection.iceConnectionState);
        };

        // Trigger signaling events joining a room, so that many ot
        socket.emit('join-room', 'roomId'); // Replace 'roomId' with your room ID

        // Event listener for receiving signaling messages

        // when the system gets offer from other peer
        socket.on('offer', async (offer) => {
            // setting that offer in remote desctiption
          await peerConnection.setRemoteDescription(new RTCSessionDescription(offer));

            // creating an answer and then setting it locally and thn sending it to other peer
          const answer = await peerConnection.createAnswer();
          await peerConnection.setLocalDescription(answer);
          socket.emit('answer', answer);
        });

            // saving the answer sent by the other peer in remotedescription
        socket.on('answer', async (answer) => {
          await peerConnection.setRemoteDescription(new RTCSessionDescription(answer));
        });

        // setting the ice candidates of other peer send via server
        socket.on('ice-candidate', async (candidate) => {
          try {
            await peerConnection.addIceCandidate(candidate);
          } catch (error) {
            console.error('Error adding ice candidate:', error);
          }
        });
      } catch (error) {
        console.error('Error accessing media devices:', error);
      }
    };

    startWebRTC();

    return () => {
      if (peerConnection) {
        peerConnection.close();
      }
    };
  }, []);

  const handleSendOffer = async () => {
    const offer = await peerConnection.createOffer();
    await peerConnection.setLocalDescription(offer);
    socket.emit('offer', offer);
  };

  const sendIceCandidate = (candidate) => {
    socket.emit('ice-candidate', candidate);
  };

  return (
    <div>
      <div>
        <h2>Local Stream</h2>
        <video ref={localVideoRef} autoPlay playsInline></video>
      </div>
      <div>
        <h2>Remote Stream</h2>
        <video ref={remoteVideoRef} autoPlay playsInline></video>
      </div>
      <button onClick={handleSendOffer}>Send Offer</button>
    </div>
  );
};

export default App;
- Backend: Utilize a Node.js server with Socket.IO for WebSocket connections
const express = require('express');
const http = require('http');
const { Server } = require('socket.io');

const app = express();
const server = http.createServer(app);
const io = new Server(server);

io.on('connection', (socket) => {
  console.log('A user connected');

  socket.on('join-room', (roomId) => {
    socket.join(roomId);
  });

  socket.on('offer', (offer) => {
    // emmiting offer to a particular room from which the offer is coming
    socket.to('roomId').emit('offer', offer);
  });

  socket.on('answer', (answer) => {
// emmiting answer to a particular room from which the offer is coming
    socket.to('roomId').emit('answer', answer);
  });

  socket.on('ice-candidate', (candidate) => {
    socket.to('roomId').emit('ice-candidate', candidate);
  });

  socket.on('disconnect', () => {
    console.log('A user disconnected');
  });
});

const PORT = process.env.PORT || 3001;
server.listen(PORT, () => {
  console.log(`Server running on port ${PORT}`);
});
Some Extra Problems I Faced:
While developing and deploying the video-calling app, I encountered a few additional challenges that are worth mentioning:
SSL and Domain Requirement: When deploying the app in production mode, it's essential to have SSL (Secure Sockets Layer) encryption and a registered domain. Browsers enforce strict security policies, allowing access to video and audio devices only on HTTPS websites. Therefore, obtaining an SSL certificate and setting up a domain is necessary to ensure your web app functions correctly.
Challenges with Long-Distance Connections: Establishing connections over large distances can pose difficulties, especially when relying on a low-powered signaling server. In such cases, the latency and reliability of the connections may be affected. Additionally, using a default STUN (Session Traversal Utilities for NAT) server may not suffice in a production-ready environment. Setting up your own STUN server or utilizing TURN (Traversal Using Relays around NAT) servers may be necessary to ensure stable connections across various network configurations.
What I Created:
I've developed a random video calling and chatting application called TALKIE, inspired by platforms like Omegle. Unlike traditional solutions that rely on queue services like Redis or Kafka, I opted for a simpler approach using basic arrays—one for users and another for the queue. You can find the code on my GitHub repository.

In TALKIE, users are randomly fetched from the queue and connected for spontaneous video conversations. To see TALKIE in action, check out the demo video on my LinkedIn post:
Github Repo: https://github.com/SinghYuvraj0506/Omegle-clone
Conclusion:
Congratulations! You've just created your very own video-calling app using WebRTC and WebSockets. With these powerful technologies at your disposal, the possibilities are endless. Whether you're building a virtual classroom, hosting remote meetings, or simply staying connected with friends and family, you now have the tools to make it happen. Keep exploring, keep learning, and happy coding!
That's it for now, folks! Stay tuned for more beginner-friendly tutorials on our tech blog. Until next time, happy coding!